


.png?width=300&height=122&name=Untitled%20design%20(34).png)
The risk of poor workmanship and the cost associated with it is a big factor when you are looking to screed a floor. That’s why the first and most important step when looking to screed a floor is choosing the right screeding contractor.
The ideal screeding contractor should have:
- Extensive experience
- A skilled work force
- The latest equipment and technology
- Strong references
- A good track record of delivering on time and within budget
When it comes to fast drying liquid screed, Cemfloor by McGraths Cong are industry leaders with industry experience surpassing 50 years and more importantly McGraths Limestone have 15+ years’ experience specifically in the liquid screed industry. We know that to guarantee quality and consistency a skilled work force is of the upmost importance and therefore all Cemfloor distributors are carefully vetted and chosen. We also make sure that our distributors receive full time technical support and continuous training as required.
To make sure we deliver the highest standards, we have developed a step by step process on how we screed a floor to ensure the perfect finish:
Choosing The Right Floor Screeding
We offer 3 types of screed
- Bonded screed
- Floating screed
- Screed with underfloor heating
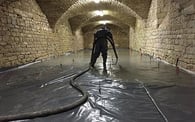
Site Preparation Before Screeding A Floor
As we offer 3 different types of screed, site preparation differs for each one
Bonded screed:
- Remove all dust and debris from the subfloor and surface
- Repair any cracks that are on the subfloor
- Apply a coat of bonding to the subfloor the day prior to installation and let it dry overnight
- A second coat of bonding will then be added one hour before Cemfloor is poured
Floating screed:
- Remove all dust and debris from the subfloor and surface. Ensure the floor insulation sheets are fitted correctly and not loose
- Stretch out polythene sheeting, making sure there are no creases to cover the insulation
- Turn up the perimeter walls 75mm
- 7mm minimum edge expansion strip is then used around the perimeter walls and any upstands that are in the floor
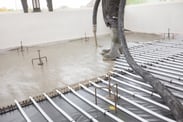
Screed with underfloor heating:
- Remove all dust and debris from the subfloor and surface
- Ensure floor insulation sheets are fitted correctly
- If there are any gaps, they need to be filled with gun grade expanding foam and covered with polythene sheeting
- Next 7mm minimum edge expansion strips or 25mm insulation strips are used, this is dependant on the heating designs specification
- Remove debris that is left after the installation of the heating pipes
- 25mm cover over the heating pipes has to be adhered to
- days after the Cemfloor has been installed, the heating system can be commissioned
How To Install The Floor Screed
Prior to the pouring of the screed you must ensure that the building is fully weather tight with all windows and doors fitted. If not, polythene or plywood should be used to temporally block these openings. When the Cemfloor truck arrives on site, the mixing drum is put at full speed for a minute to increase the flow. A flow test is then carried out to make there is a flow of between 230mm and 260mm. If the correct flow has been achieved the screed can be pumped into the building, this is done at pre-arranged heights which have been determined by the engineer on site. Once the Cemfloor has been pumped into the building it is then dappled twice in both directions 90 degrees to each other. When this has been complete you must spray a light mist of Cemfloor evaporation control evenly over the entire surface of the screed. To ensure that the Cemfloor cures properly all openings must be completely covered.
After Installation Of The Screed
After the liquid screed has been installed it is time for the finishing touches. All windows and doors should be opened after 24 hours to make sure the building is vented. It is recommended that this is to be done every day until the heating has been commissioned.One of the benefits of Cemfloor screeds is that there is no need for any sanding before tiling, just make sure you have removed any debris or spillages. Finally, before you fix any floor covering to Cemfloor with underfloor heating, make sure your heating contractor has fully commissioned the heating system. Once this has been done a moisture test must be taken for the fixing of timber floor and vinyls.
If you wish to learn more about Cemfloor, Contact us today